Butternut Squash Soup

The weather is warming up, but I promised my Butternut Squash recipe.  Hopefully, there is a cold day lingering before spring is in full bloom.  Otherwise, save this post for Winter 2013!

butternut squash soup

Ingredients
1 LB Butternut Squash cubed
1 small Onion chopped
1 1/2- 2 cups Chicken Stock
1 T Butter
2 1/2 oz heavy cream

1. Chop the onion and squash.

2. Add the chopped onion and butter to a saucepan large enough to fit all the ingredients. Cook on medium heat until the onion in translucent.

3. Add cubed butternut squash and 1 1/2 cups of chicken stock to the saucepan.

4. Simmer until the butternut squash is tender. About 15-20 minutes.

5. Remove from heat and spoon into a blender. Pureé the squash, onions and stock, then add the heavy cream. Add extra stock if needed.

6. Add salt and pepper to taste and enjoy!It is so easy, and so delicious!

Lapsang Souchong Blood Orange Scones

Before the season is over I swore I would make Blood Orange Scones.  Today was the day!  As I was steeping a cup of Lapsang Souchong last night, I thought it would be great to add into a scone recipe.  So I saved my tea leaves, and added them into my scones this morning.

Lapsang Souchong is a black tea that has a deep, smoky flavor when brewed.  It is great to use in a rub or in a savory sauce.  Add some into brownies to enhance the chocolatey flavor.  Either way you use it, I’m sure it will be delicious!
IMG_0279

I also thought it would be appropriate to make them, as I am currently reading Laura Child’s Blood Orange Brewing!  A tea shop mystery series brewing with murders, clues and tea!

IMG_0271

Preheat oven to 425°

Ingredients:
2 cups flour
1/3 cup sugar
2 1/2 tsp baking powder
1 tsp brewed Lapsang Souchong leaves
8 TBS frozen butter (grated)
1 blood orange zested
4 TBS blood orange juice
1 cup heavy cream

Directions:
1. Combine  dry ingredients into a bowl.
2. Add the tea leaves.
3. Grate the butter into the flour mixture and toss until the butter in incorporated.
4. Add the zest, juice and cream and fold together with a rubber spatula.
5. Once  everything holds together in a dough, form it into a log and cut into squares, then into triangles.
6. Place onto parchment lined baked sheet and bake for 12-16 minutes.

Serve with honey or clotted cream.

IMG_0264


x Miss G


Chocolate Sour Cream Cake

The best reason to bake is to bake for someone else.  My best
friend Maddy had a birthday coming up and of course I planned to make
something special.  I chose to make a 3-layer chocolate sour cream cake, because
chocolate is her favorite. For the frosting, I made brown sugar maple to give a
little surprise.

I decorated it with pastel dragées and bunting I made from masking tape, yarn and chopsticks.

Ingredients:
FOR CAKE
 1 cup unsweetened cocoa powder
 1 cup boiling water
 1 cup butter
 2 1/2 cups sugar
 4 eggs
 3 cups flour
 6 T cornstarch
 2 t baking soda
 1/2 t baking powder
 1 cup sour cream

FOR FROSTING
4-5 cups powdered sugar
1 cup brown sugar
1 cup maple syrup
1 cup butter
4 T milk (optional)

Preheat over to 350°

1. Dissolve cocoa in water.
2. In a bowl combine butter and sugar. Add eggs one at a time.
3. Mix together flour, cornstarch, baking powder and baking soda. Gradually add mixture into butter mix.
4. Add sour cream.
5. Pour evenly into 3 greased and floured 9″ round cake pans
6. Bake for 30-40 mins at 350°

While cake is baking, make the frosting
1. Beat butter until smooth.
2. Add brown sugar and 2 cups of powdered sugar to butter and mix until combined.
3. Add maple syrup and 2 cups of powdered sugar and mix until combined.
4. Add the rest of the powdered sugar if necessary. To thin the frosting add the milk 1 T at a time.

When the cake is done, cool, then refrigerator for 1 hour. Then frost.

Cucumber Tomato Salad

Today was a beautiful 75°F and sunny. I couldn’t wait to spend my Saturday outside in the park.  I knew I’d get hungry so I threw together this delicious cucumber tomato salad and hit the park.  The park eventually became uninviting, as it was some sort of organized dance parade that sounded like Electric Zoo, but it was relaxing long enough to enjoy my lunch.

Ingredients:
1/2 hot house cucumber
2 plum tomatoes
1 1/2 tsp oil
1 T finely chopped red onion
splash of white vinegar
salt
pepper
oregano

1. Wash and cut cucumber in half lengthwise, then into slices and fold into a paper towel to absorb excess water.
2. Wash and chop tomatoes into bite size pieces.
3. Cut the onion and add them into a bowl with the cucumber and tomato.
4. Drizzle with remaining ingredients and toss.

Serve with bread for dipping.

*For a heartier meal add red or white beans or peppers.

Enjoy!
xxx G

Roasted Broccoli and Lemon Quinoa

It is crunch time for me as I finish up my last academic paper and get things ready for my BFA Open Studies on Thursday.  I kept procrastinating and writing my paper in hopes that my hunger will pass, for I cannot spare enough time to cook up something decently healthy.  But, alas! I was able to make something both delicious and time saving!

(Yes, I am writing this post, instead of my paper. I am also eating this as I write)

I put the quinoa in the rice cooker, the broccoli in the oven, then I wrote while they cooked.  The cooking time equated nicely to my writing time before I needed to take a break.

But whether you have time to make a five course meal, or you need a quick fix, eat this healthy, vegan-optional treat!

Preheat oven to 425°
Ingredients:
1/4 cup quinoa
1/2 cup water or stock
1/3 stalk of broccoli
1/2 lemon 
olive oil
salt
pepper 
feta cheese (optional)

1. Preheat oven to 425°.
2. Cut and wash broccoli and place on a baking sheet sprinkle oil, lemon (only half of the half), salt and pepper.  Shake it around the pan to make sure everything is coated, then place it in the oven for 15-20 minutes, or until browned.
3. Wash quinoa, then place water/stock, quinoa, oil, salt and pepper in a rice cooker. Or cook in a saucepan. Cook for 15-20 minutes
4. When the time is up, mix together the broccoli and quinoa, then add the remaining lemon juice.  Add the feta if desired.

Enjoy xx G

Earl Grey Shortbread Cookies

In each of my classes at school, we all generally sit in the same seats every week, next to the same people. This past Monday I ended up sitting next to my friend Ryan, which was quite a please might I add.  He said he wasn’t having a good day and all he wanted was for class to end before it even started.  I told him, “I can’t make that happen, but I can bake you something! What do you like?” He said, ” Do you make brownies?”  And I replied, “No, do you like peanut butter, or earl grey? I can make you earl grey shortbreads.”  As Ryan agreed that shortbreads would make him happy, Maddy (my friend sitting on the other side of me) added, ” you can dip them in chocolate.”  So it was settled, I would bake him Earl Grey Shortbread cookies dipped in chocolate and bring them to class on Wednesday.

So you may be confused about two major things
1. I don’t make BROWNIES??!?!?
2. Where are the Chocolate Dipped Earl Grey Shortbread Cookies?

To clear up the first issue, unfortunately I don’t like chocolate, so I don’t make brownies because I don’t care for them.  I am aware that it is a near catastrophe for both cases, but how can I guarantee that my brownie recipe will be great, if I don’t have a palate for quality brownies?

I did not dip my cookies for two reasons: 1. I didn’t have chocolate chips.  and 2. These cookies are melt-in-your-mouth PERFECTION! So adding a shell of chocolate seemed unnecessary in terms of both taste and texture.

With that said, I bring to you the recipe, which also includes directions for the chocolate dipped version if you wish to try it.  Enjoy!

Makes about 36

Ingredients:
1 3/4 cups flour
3 tea bags (or 2 T) earl grey tea leaves
3/4 cup conectioners sugar
2 sticks salted butter (room temperature)

6 oz chocolate chips

1. Combine flour and tea leaves.
2. Add confectioners sugar and butter.
3. When all the ingredients are almost combined, finish the dough by quickly and loosely kneading in the loose crumbs. Flatten into a disk (about 1″ thick) and refrigerate for 30 minutes. Preheat oven to 375°.
4.  Unwrap the dough and place on a lightly floured (or powdered-sugared) work surface.  Roll the dough into a 1/3-1/4 inch thick rectangle. Cut into strips or squares or any shape your heart desires.  (I cut mine into 3 columns and 12 rows to make 36 rectangles).
* the warmth of your hands should melt the butter and make the dough workable, but if not add 1-2 tablespoons of water
5. Place cookies onto a parchment lined baking sheet and bake for 10-12 minutes, rotating half way through.

For Chocolate Dip:
1. Once cookies are out of the oven and cooling, melt the chocolate in a double boiler.
2. Dip cooled cookies into chocolate and place on parchment paper to let the chocolate set.

xxx Miss G

Pão de queijo- Cheese Bread

This past summer I spent about two months in Brazil.  I stayed with my brother and his family is Rio, and while I was there I met wonderful people, new friends, went to beautiful places and picked up a little Portuguese.  The slight differences in the brazilian culture compared to the American, is one to appreciate only by being immersed in it.  Though on occasion I regret not visiting Cristo, I enjoyed going where the locals went and doing what the locals did.  But I did go hanging gliding in São Conrado!
One part of Brazil that one can not escape experiencing, tourist or not, is the pão de queijo.  It is as easy to find as it is to find pizza in NYC, it is everywhere; and it is delicious too. There are moments I wish I was back in Rio, but knowing I can make my own pão de queijo, I can stay in the US a little longer.  The only difference between mine and ones in Brazil is the type of cheese.  In Brazil they use a cheese called “queijo minas” which I have not found in the NYC.  Parmesan seems to be the next best thing and works just as well.
The Brazilian holiday Carnaval was recently celebrated last weekend and I couldn’t help but find a way to celebrate myself.  I could have gone out dressed up in sparkles and feathers, but instead, I made 
pão de queijo and listened to Seu Jorge on Pandora Radio.

As soon as the pão de queijo came out of the oven, my friends Matt and Joe called to say they were on their way over.  Thank goodness for that because I wasn’t going to eat 30 all by myself!  The boys came over with milk and a box of fruit loops, but gladly put it on hold to eat some pão de queijo.
These little balls of goodness are great for feeding some friends or having as a snack. You can shape the dough into balls, freeze them and cook a few at a time to snack on.

Makes 30
Ingredients:
1 stick butter
1/3 cup water
1/3 cup milk
1 tsp salt
2 cups tapioca starch/flour
2/3 cup grated parmesan cheese
2 eggs
Preheat oven to 375°
Step 1:  In a saucepan melt butter, then add water and milk and bring to a boil.
Step 2: Remove the pan from the heat and slowly add the tapioca statch while stirring with a wooden spoon.
Step 3: Let the mixture cool for 10 minutes. Then add the eggs and cheese.  Knead the mixture for about 6 minutes, or until it is (mostly) smooth.
Step 4: Grease a cookie sheet then using a tablespoon, scoop the dough into a ball and place it on the cookie.  Cook for 20 minutes or until the the outside is crispy.
Serve warm and enjoy.
xx G

Perfect (Raspberry) Scones

When I was younger I remember my mom and her friends taking a 40+ minute drive to Chester,NJ to a tearoom for lunch.  She would always bring back scones for my brother and dad.  At the time I wasn’t a fan, but boy were things going to change.  At the age of 19 I had my first scone in San Francisco airport waiting for my flight to LA.  I’m not sure what made me choose a blackberry-raspberry scone over a croissant, but I’m glad it happened.  Once my trip was over and I went back to NJ I searched and searched for just the right recipe.  Right off the bat I had a good experience with scones, but my mom warned me that if not made just right, they can be dry.  So, I chose carefully, a recipe from Picky Cook, and made my own version.  This is one of the few recipes stored in my brain because I use it way too much!  I hope you enjoy them as much as I do.

My Valentine’s Day gift to all of my lovely readers, whether devote followers or search-engine  finders, is this kick-ass recipe that will keep your loved ones loving you even more.  Whether it be a husband or wife, boyfriend or girlfriend, co-worker or friend, these Raspberry Scones are perfect to share with your loved ones on Valentine’s Day.
You can eat them plain or serve them with clotted cream. Clotted cream can be found at specialty stores, such as King’s, but it is sometimes unavailable or expensive.  So, instead, I make a spread of 1 dollop of sour cream and a pinch or 2 of sugar per scone.

*This recipe is great with or without raspberries too.*

* adapted from Picky Cook
 Makes 8
Ingredients:
2 cups flour
1/3 cup sugar
2 T baking powder
1/4 t baking soda
7 T butter (frozen and grated)
1/2 cup milk
1/2 cup sour cream
6oz cont. raspberries

Preheat oven to 425°
1. In bowl mix flour, sugar, baking powder and baking soda.
2. Grate the butter into the dry ingredients, evenly incorporate the ingredients.
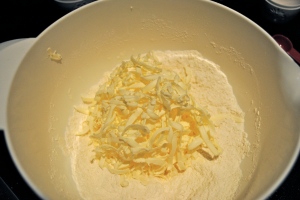
3. In a separate small bowl, whisk together milk and sour cream, then add it to the larger bowl.
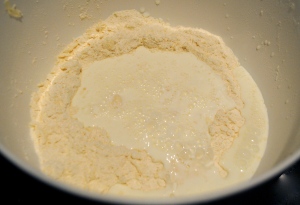
4.  Begin to mix the wet and dry ingredients with a rubber spatula, just until combined, then transfer to a floured surface.
5.  Knead the dough until it no longer falls apart.  Roll out, fold it up and roll it out again.  Freeze for 5 minutes.
6. Remove the dough from the freezer and roll out into a rectangle (about 8×14)
7. Lay out the raspberries (if using), leaving 2ins. of empty space on one longer edge.
8. Starting from the longer end with more raspberries roll the dough into a jelly roll.  If you’re not using raspberries, just roll it up. 
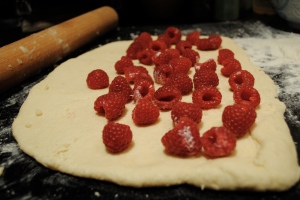
9. Cut the roll in half, then cut each half in half.  Then cut the 4 squares diagonally to make triangles.
10. Bake on an ungreased baking sheet for 18 minutes, or until tops are lightly golden.

To reheat, warm in an oven at 375° for 8-10 minutes.
Dough can be made ONE night ahead, and refrigerated.

Happy Valentine’s Day!
xxxG

Sugar Cookies with Pomegranate Cream Cheese Frosting

Whenever I ask my friends what I should bake for them, whether it be a birthday, or a small get together, the unanimous request is “the cookies with that dip”.  They’re actually simple sugar cookies, but with a side of pomegranate cream cheese frosting for dipping!  I found this recipe from Alton Brown and it’s just fantastic!  Alton makes sandwiches with his cookies, but I think it’s a lot easier to have people dip the cookies.  Also, after being a picky eater (for about 20 years), I am very conscious of other peoples need for variety and options.  So the option remains, to dip, or not to dip. (I thought about deleting this sentence, but it is what it is.)

While planning a holiday party for my friends, I was obviously asked to make my cookies with the dip for it and I did, of course, holiday style.  But whether they are for a holiday, a birthday party or just because you want to eat some delicious cookies, these are perfect, and delicious

Ingredients:
3 cups flour
3/4 t baking powder
1/4 t salt
2 sticks unsalted butter
1 cup sugar
1 egg
1 T milk
powdered sugar (for rolling)

8 oz  cream cheese, softened
4 T unsalted butter, softened
1/2 cup powdered sugar
3 T pomegranate juice

1. Combine flour, baking powder and salt.
2. In a separate bowl beat sugar and butter together.
3. Add egg and milk to butter mixture.
4. Slowly add the flour mixture to the butter.
5. Divide the dough in half, wrap in plastic wrap and refrigerate for 2 hours.
6. After the 2 hours, preheat oven to 375°
7.  Remove 1 half of the dough,  roll out onto a powdered work surface and cut out shapes with cookies cutters ( I recommend small shapes because they are easier for dipping.)
8. Place cookies onto parchment lined cookies sheets and bake for 8 minutes, turning the pan half way through baking time.
9. After the cookies are baking, let cool for 1-2 minutes then transfer to a cooling rack.
10. Repeat steps 7-9 with 2nd half of dough.

While cookies are baking and cooling, make the frosting.
1.  Mix together cream cheese and butter, making sure they are both room temperature so they mix together easily.
2.  Add the powdered sugar and pomegranate juice and mix.

xxx G

Red Wine and Hazelnut Quinoa

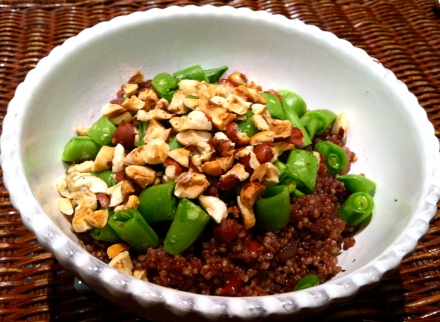
After a week of holiday festivities and rural suburbia, it feels good to be back in New York City.  I didn’t have much food to make for dinner, but I grabbed what I had and made something delicious.  I’m really excited about this recipe because I’m always in need of something that is good when served cold.

I would normally say to omit an ingredient or two if you want, but in this recipe it is a good idea to add in everything.  The snap peas add and little sweetness and crunch, as do the hazelnuts.

Ingredients:
2/3 cup uncooked quinoa
1 cup red wine
1/3 cup water
1 tsp olive oil
1/2 small onion
1/2 red bell pepper
handful sugar snap peas (about 10)
1/4 cup cooked hazelnuts (about 20)
1 T olive oil
salt

1. Preheat your oven to 450°.
2. Dice the bell pepper and onion.
3. Put the quinoa, red wine, water, onions, bell peppers, salt and oil into a rice cooker. 4. While the quinoa is cooking, put the hazelnuts in the oven for 10 minutes.
5. Cut the snap peas.
6. When the hazelnuts are done cooking, let cool, then crack open and break the nuts into pieces.
7. When quinoa is done cooking, add in the tablespoon of oil, and mix in the snap peas and hazelnuts. Chill for 10 minutes.

enjoy!
xxxG